Lua Tutorial
This is a beginner guide for Dual Universe Lua scripting.
Preamble
I have little experience with Lua coding in general. This tutorial only covers very basic things and should help beginners to get started with Dual Universe scripting. If any information is plain wrong or there are much better ways to do something contact me in Discord (link can be found at the bottom of this tutorial).
WTF is Lua scripting?
Dual Universe offers players the option to "extend" the game just like many other games e.g. World of Warcraft also supports Lua scripting through add-ons (if you ever played WoW you probably used one or more add-ons to extend the user interface). The scripting in Dual Universe is implemented in a pretty fun way because you can actually place a control unit like the Programming board somewhere in the game world and connect it to other devices. With Lua code you can bring those connected elements to life. In Dual Universe you don't need scripting for very basic things. The link tool allows you to connect a switch to a door and when you tap the switch the door will open/close. For this basic stuff you don't need scripting at all - but you can do the same and much more with scripting. Scripting in Dual Universe is much more accessible than in some other games because you don't need to create code files in your file system. Beware: If you don't have any experience in programming and HTML sounds like an illness to you - scripting is probably not for you. Most examples in this tutorial do not require programming skills but having some programming knowledge could help a lot.
Getting started
There are different control units in the game that can be scripted but this tutorial will primarily cover the Programming board. After placing it right click > Advanced > Edit Lua script or just press Ctrl + L. Next thing you see is the Lua editor.
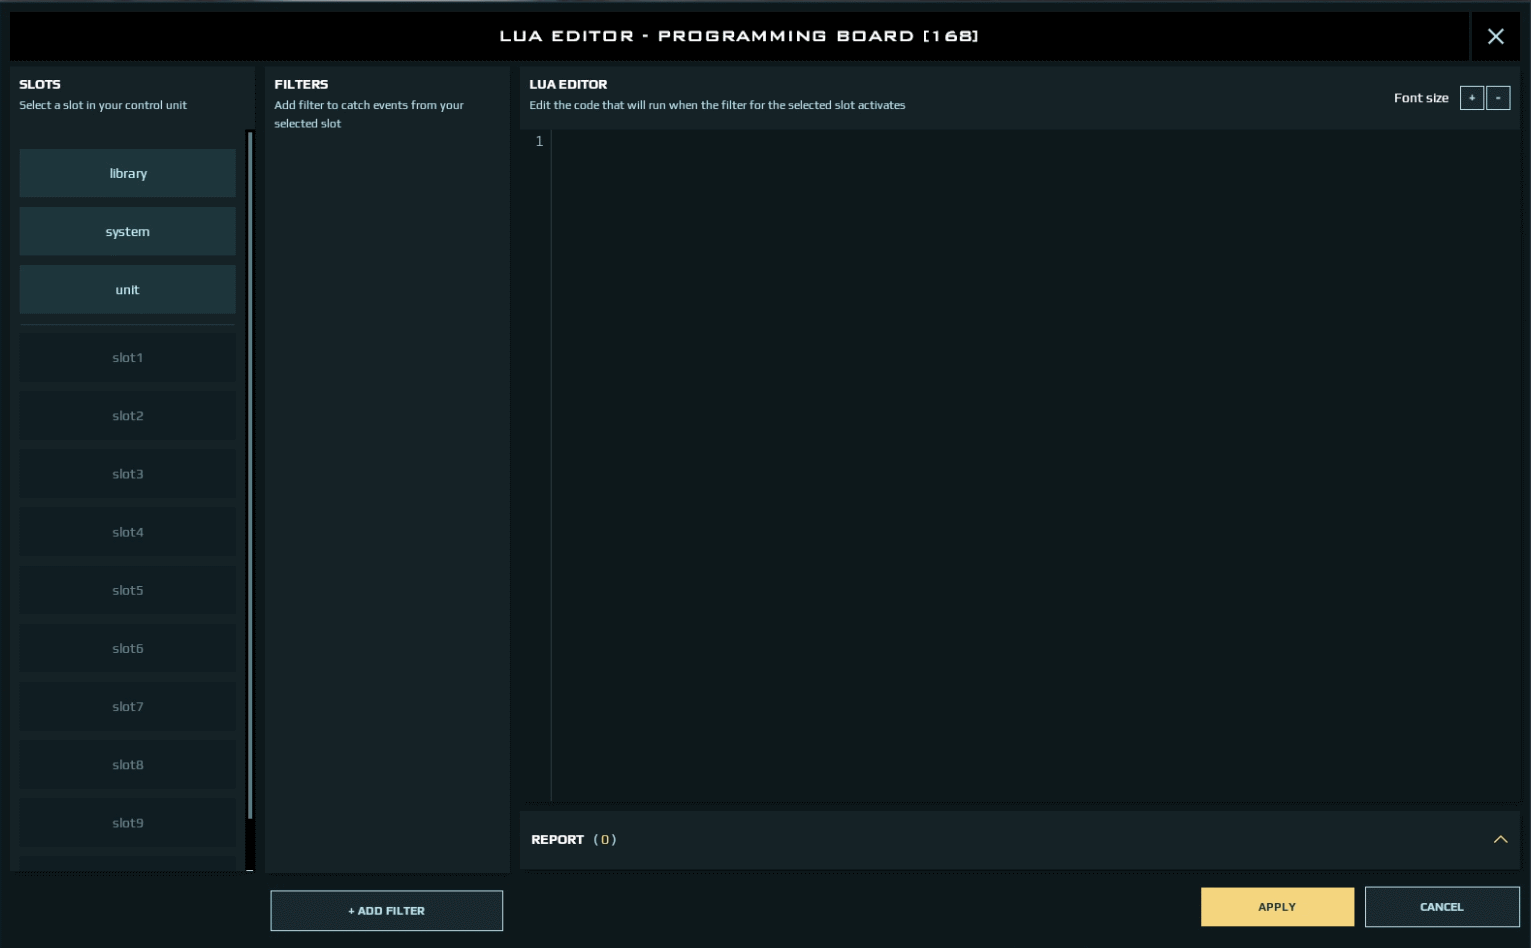
On the left side are library, system and unit slots. There are also 10 empty slots for connected elements. To the right of the slot list is the event filter list. You can add multiple event filters for every slot. On the right side there is finally the Lua editor text area.
You can use the link tool in build mode to connect the Programming board to other objects like lights, buttons, doors, containers, industry and more (make sure the link goes from the Programming board to the connected object). The maximum number of objects linked to a Programming board is 10. You can bypass this limitation in a way using Relay units but those are limited to on/off (you cannot directly link a Relay unit to the Programming board so add e.g. a switch to transfer on/off status).
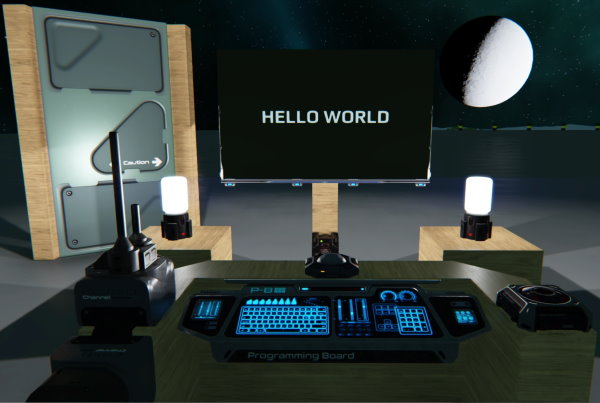
Example 1: There will be light
Let's start with a very simple example. Place the Programming board and a light e.g. a Vertical Light XS. Use the link tool to connect the Programming board to the light.
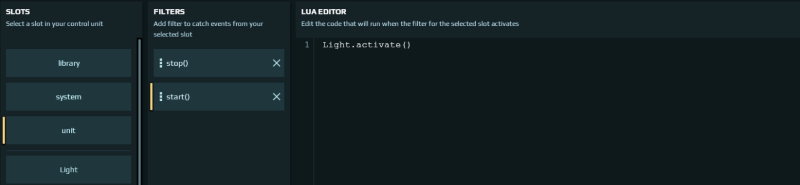
Target the Programming board and open the Lua editor by pressing Ctrl + L. You will see slot1 is now highlighted which means it's connected. Click slot1 and change its name to something more remarkable like "Light" (use any naming convention you like but stay consistent).
Select the unit slot. The unit slot is the control unit itself (the Programming board). Add an event filter to the unit slot (click + ADD FILTER at the bottom of the filter list). Move the mouse over the dots next to Select event().
You should see the following list of events:
- start
- stop
- tick
The start and stop events are called once when the control unit is activated or deactivated respectively. The tick event listens to a timer (this will be covered in the next example). What kind of events you can filter depends on the connected element. Some filters can even have parameters.
For now just select start and move your mouse over to the Lua editor text area. This is the place where you will write the actual Lua code that should execute when the unit (Programming board) is started.
Light.activate()Create another filter stop and add the code.
Light.deactivate()Apply the changes and activate the Programming board. The light will turn on and off when the Programming board is activated/deactivated.
Open the Codex Scripting section if you want to get more information on the Element API. There is list of all methods (activate, deactivate and so on) available that can be called on elements (like lights, doors, industry, databank and so on).
Trivia When the control unit is activated the start event will be triggered for all slots respectively when the control unit is deactivated the stop event will be triggered for all slots. You could also use the start and stop event filters of the Light slot instead of the unit slot. Using the Light slot could help the readability of your code - but that's up to you to decide.
Example 2: Timers
Probably one of the more interesting and fun things you can do with scripting is adding a timer. The timer needs a name and will be executed every X seconds.
Select the unit start event filter and add the code.
unit.setTimer("mytimer", 2)Create a new event filter tick in the unit slot. The tick event filter expects a timer that it should listen to - so just enter "mytimer" and add the Lua code.
Light.toggle()
The light should just switch on and off every two seconds after activating the Programming board.
Timers can also be used for continuous updates of screens, industry status and much more.
Trivia A timer can be stopped using unit.stopTimer("name").
Example 3: Displaying data
Screens and signs can be used to display information. Place a screen and connect it to the Programming board.
For now just use the unit start event filter and add the code.
Screen.activate()
Screen.setCenteredText("Hello World")
When you activate the Programming board you will see the message on screen. That's pretty basic but you can do even more. You can use HTML and CSS. Replace the Screen.setCenteredText code.
Screen.setHTML([[
    <style>
    div {
        background:red;
        color:white;
        font-size:5vw;
    }
    </style>
    <div>Hello World</div>
]])Now let's add some interaction between elements. Show the lights status on screen. Click the tick event filter and add some code.
local lightStatusText = "off"

if Light.getState() == 1 then
    lightStatusText = "on"
end

Screen.setCenteredText("Light is " .. lightStatusText)
And don't forget to add the stop event filter to deactivate the screen or the text will not be cleared after deactivating the Programming board.
Screen.deactivate()Example 4: Databank
The Databank is a data storage element pretty much like a database. You can store string, float and int values in it.
Place a Databank, screen and a Manual Switch to demonstrate how to persist data in a Databank. Create a pressed event filter for the switch and add the code.
Databank.setStringValue("myvar", "Hello!")Start the Programming board and press the switch. Deactivate the Programming board after that. Next add a unit start event filter and put code into it to display the value stored in the Databank.
Screen.setCenteredText(Databank.getStringValue("myvar"))You will see the text "Hello!" on your screen after activating the Programming board.
So, what can you actually do with a Databank? As the number of slots on every Programming board is limited you could store information in a Databank and share it across multiple stations or aggregate data in your command center.
The following code outputs information about all stored data.
system.print(Databank.getNbKeys() .. " keys stored in databank")

local data = json.decode(Databank.getKeys())

for k, v in pairs(data) do
    system.print(v .. " = > " .. Databank.getStringValue(v) .. " / " .. Databank.getIntValue(v) .. " / " .. Databank.getFloatValue(v))
end
Example 5: Detection zone
The Detection zone can be used to react to players entering its area. The enter/leave event filters accept the * wildcard parameter or a specific player id.
system.print("Player " .. database.getPlayer(id).name .. " entered the detection zone")
Example 6: Sharing data between constructs
You can place an Emitter on construct A and a Receiver on construct B to send messages from construct A to construct B. That way you could for example activate landing lights on your static construct when closing in with your spaceship or open the hangar gates.
Sending a message is pretty straight forward - you could do this when pressing a switch (you should hopefully now be able to do that by yourself).
Emitter.send("gate", "open")The other construct needs a receive event filter on the Receiver element with corresponding "gate" channel and "open" message (or the * wildcard that handles all messages).
Gate.activate()
Using a Programming board or button to send messages might be an option for bigger ships but when you pilot a small vessel pressing a keyboard button makes more sense. This time open the piloting seat Lua editor (some seats are also control units capable of being scripted!) and use the system slot to add an actionStart event filter (you need to choose an action - those can be assigned to keys in the game piloting controls menu). For example add the actionStart(option1) event filter and put the open gate message in it. Jump on the piloting seat and press Alt + 1. The message will be send to the other construct.
Trivia You can actually use some keybinds on the Programming board. e.g. option1. Target the Programming board and press Alt + 1.
Tips & tricks
Exporting variables
Exporting variables
This is explained in the Codex but I will still cover it here. Exporting a variable means its value can be set from the "outside".
someValue = 2 --exportRight click the control unit > Advanced > Edit Lua parameters
Code reuse
The Databank is your friend. You can store HTML/CSS templates as string values and just use it on any of your screens (corporate identity).
Databank.setStringValue("css", [[
    div {
        background:blue;
        color:yellow;
        font-size:5vw;
    }
]])

Databank.setStringValue("template", [[
    <style>#css</style>
    <div><b>#var1</b></div>
    <div>#content</div>
]])

local template = Databank.getStringValue("template")
template = string.gsub(template, "#css", Databank.getStringValue("css"))
template = string.gsub(template, "#var1", "Title")
template = string.gsub(template, "#content", "...")

Screen.setHTML(template)
Actually this can be extended quite a bit and you can even share your HTML/CSS templates across your constructs. This could for example be done with bi-directional communication (construct A and construct B both need an Emitter and a Receiver). Construct A requests the template (Emitter sends message), construct B responds to the request (Receiver receives the request, Emitter sends the template data), construct A receives the template data (Receiver fetches wildcard message).
Working with data
Some of the element API methods return JSON data. e.g. the Databank getKeys() method will return all registered keys in a JSON object.
local keys = json.decode(Databank.getKeys())

for key, value in pairs(keys) do
    system.print(key .. " => " .. value)
end
Debugging
You can print information to the Lua console (which is part of the chat window). This is a little bit less trouble than using a screen for test output.
system.print("Hello Lua console")Limitations of the Lua API
- You cannot list items in a container
- You cannot change industry recipes
Support or feature requests join Discord